Target Audience in SharePoint Online (News Web Part & Event Web Part)
SharePoint has target audience feature to hide and show the
information for the authorized audience. That is the way to manage the critical information
only for required group of people that is called Audience.
In SharePoint Online, few out of box web parts which are following
below supports audience targeting.
- News Web part
- Events Web part
- Highlighted Content Web part
- Quick links Web part
- At Site Page library
- Navigation links
- Viva Connection Dashboard
In this blog, Only
News Web Part and Event Web Part will be discussed.
New Web part –
Whenever
any author is creating news post. It creates in Site Page library as a new
page. So enable audience targeting is a two-step
process that are given below.
- Enable audience targeting at Page Library in which your news pages are created.
- Enable audience targeting at the news web part level.
We will discuss one by one each process.
Step-1 Enable audience targeting at Page Library-
- Open the home page of your site and click on the site content in gear button setting in header.
- Select the ellipses (…) and click
on settings. It will redirect to the library settings
- Select the audience targeting setting.
- Enable audience targeting and save
it by click on OK button.
- Go to the Site Pages library and edit the existing post.
- Choose the audience and save the post.
Step-2 Enable audience
targeting at the news web part level.
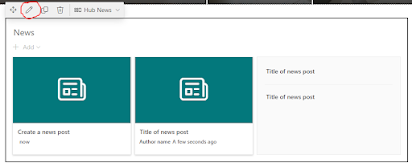
- To enable audience targeting in this web part, you need to move the page in edit mode.
- Select the new Web part and click
in edit button.
- In filter section, turn on the enable audience targeting.
Audience Targeting in
Event Web Part-
Whenever an author is adding event, it will be added in
Event List. Basically Event list has functionality like a calendar. New created
Event will be shown on calendar date on which event has been scheduled.
Enable Audience targeting for Events is also two-step
process.
1-
Enable audience at the Event List
2-
Enable audience at the Events web part.
We will cover each step ony by one.
Step-1 Enable
audience at the Event List
1.
Open the list setting of the event list.
2.
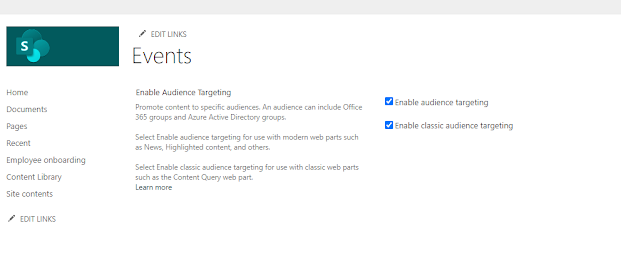
Select the Audience Targeting setting and open
it
3. In this setting, there are two options for enable audience targeting which are mentioned below.
·
Enable
Audience Targeting-
When only this option is enabled then only Audience
field will be added into the add new event form or edit existing event
as mentioned in figure below.
·
Enable classic audience Targeting-
When both options are enabled, then two
fields that are Audience and Target audience will be added as mentioned in
figure below.
Basically Target audience field supports Global Audience,
Distribution list/security and SharePoint Groups to select as audience as
mentioned in figure.
But Audience Field do not support Global audience options.
Step-2 Enable audience at the Events web part.
1-
To enable audience targeting in this web part,
you need to move the page in edit mode.
2-
Select the new Web part and click in edit button


Comments
Post a Comment